 Guides
 Dangers
- If your not competent, you will kill someone.
- Help Forum
If in doubt call a professional!!
Vaporising burner servicing
This is a guide to servicing a pot or vaporising burner, as found in AGA, Rayburn, and Stanley ranges, plus many others. This guide is for you to check your engineer is doing his job correctly. (Technicaly you dont have to be OFTEC registered to do this, but you HAVE to be competent)
These burners need regular attention, especialy if you use inferior oil ( speak to your supplier, he can help)
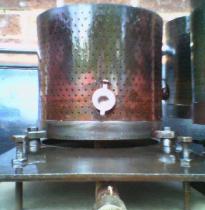
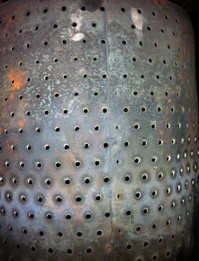
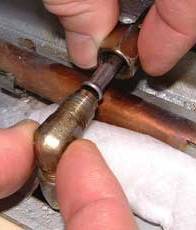
This is the main assembly, all that holds it in place is gravity and the oil pipe. Shut off the oil supply and let it burn out, and cool down.Once its cool, disconnect the oil pipe and remove the burner completely, you may need to remove / lift the shells, and slide the base out first. (Not usualy on aga's)
To service it, you need to set the oil level, level the base, renew the wicks, remove carbon deposits and set the oil flow.
Do not touch the leveling feet till you have checked level's - it may be set correctly!
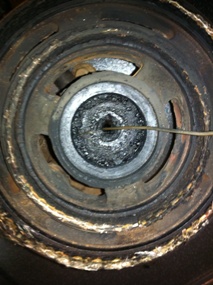
Remove the shells from the base, remove the wicks carefully, and set aside.
Inspect the base. You have to scrape carbon from the grooves the wicks sit in, the cross feed chanels, the inlet port (centre), and feed pipe. The base is cast iron, so you can scrape hard. A metal coat hanger wire is best, Use a straight wire for the grooves, then Put a tiny bend in the end for the feed tube and port, clear it totaly, then put a 90 degree bend in the end for the cross feeds.
Automotive carburettor cleaner - aerosol - will often do the job without scraping - Halfords etc.
Wicks can be had from plumbcentre, ebay etc, the height is the crucial factor - measure your old ones - but as a rule of thumb they should not protrude from the base more than 4-5mm. You will be suprised how much wick you need, and get some spare so your ready next time.
You will notice the cutouts in the wicks. These simply line up with the cross ports that feed oil from the inner shells to the outer. You will need to cut your wicks the same. The cut outs need not be more than 4-5mm high, and only need to extend the with of the ports, at most.
At a pinch, stuff the raggedy old wicks back in - these things will run on pretty rough wicks.

Leveling...... ok, the base has to be level front to back, and right to left. The oil level needs to be 4mm.
Level the base with the adjustable feet. Try to keep the height roughly the same. Do this by putting the base back into the range, without the wicks,( not connecting to the oil supply) and using a small spirit level, front to back and side to side.
Set the oil level by adjusting the oil control valve height. Firstly reconnect the oil line, turn on and let it fill for 15 minutes. Now get a pair of two pence pieces, and put them into the centre pot, on top of each other, off to one side, against the transfer ports, not in the centre, (its dipped in the centre). The oil level should be up to the top of the stack. If its too low, raise the oil valve, (raise both ends equaly, not just one, valve must stay level). Once raised, wait 15 mins to let level stabilised. If its too high, lower the valve, get a handful of tissue, mop up a good deal of oil from the base, enough to lower the level below the height of the 2p stack, and wait 15 mins. You have to mop out the oil, as sometimes the oil doesnt flow back to the valve.
Ok, now put the wicks in, making sure the cut outs line up with the ports, put the centre cap on, and push the shells back on. Stagger the seams on the shells, so there not all together, make sure the lighting port is at the front and the top ring is in place. Now pop the whole lot back in.
Take a small piece of pipe - you will need to use your ingenuity for this - and put it over the oil inlet pipe, (elbow on the left) and run to a pot. Start the oil flow, turn to 'max' and wait till you get a stable drip from your pipe. Get a syringe, idealy a 20ml one - take out the plunger, and stab the needle end into a bit of blu tack or a potato to block it. Up end the syringe and pop it under the oil drip. At the same moment start a stopwatch. In one minute you should get about 8ml (or cc). A dry Aga should be 7.6cc, A wet one 8cc, a wet stanley errigal 10cc..... The manual will tell you. Now turn the control down to minimum, and time again, A dry Aga should be 3.8cc, A wet one 4cc, a wet stanley errigal 3cc..... If your having trouble getting an accurate reading, do it over two minutes and halve the result.
Now, if its wrong, you need to adjust it..... but first, you need to check if its an adjustment problem, or a blockage. (more usual) Ive jumped ahead a bit, but its easier to explain this way.
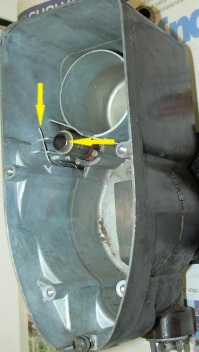
All oil valves have a metering jet. This jet is a tube with a tiny slit in it, the principal being, the more slit showing, the more oil flows. It lives in the hole shown, held down by the wire clip, also shown. A small tag on the jet rides up and down in the slot under the clip.... so dont panic - its easy to put back properly. To take out, lift the clip, lift the jet, rotate the tag out from the slot and lift out. Note - if you do this with the burner alight, right now you will be engulfed in a fireball as the oil pours into the burner..... so dont!
Heres the jet in place.
To clean the jet, get a bit of thin cardboard - like the top of a cigarette paper packet, tear it diagonally, to give a sharp point, and slip the point into the slit. slide up and down to clear debris from the slit. Do not use anything metal or you will ruin it.
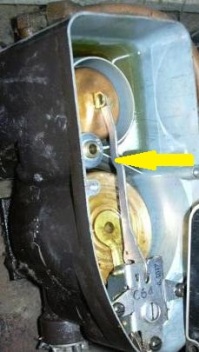
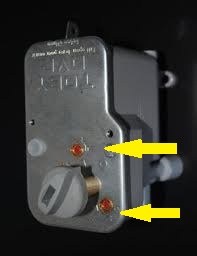
This is probably what your valve looks like, if so, the blue arrows show the screws that hold the top on.
You may have a grey knob, (yellow arrow) manual control, or you may have a grey box on the top, with wires, automatic control. If its auto, take the box off first!
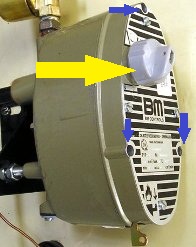
This is the modern version.... not my favorite valve...... same deal as previous. Assuming the jet is clear, and the oil flow is still wrong, you can adjust the flow. All valves have two adjustment screws, one for max, one for min. Both are marked, and both have plus and minus marks. You can adjust either one first - they dont affect each other. Adjust a little at a time, and recheck. Obviously, adjust max, with control set to max, and min with control set to min, (for electronic controls see below) Once you have got the correct flow, turn to max/min a few times and retest.
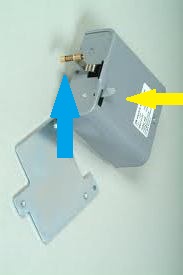
Electronic control unit - ok, this is it, its a simple system, in the box there is a little heating element, and a bimetalic strip. The thermostat allows power to the heater, the heater heats the strip, which bends and lifts the actuator (blue arrow)....... this lets the pin underneath lift, which lets the jet lift, to give more oil! easy.....
So, heres what you need to know, the actuator should lift free fron the pin by 1-2mm, when fully open - power it up, wait a few minutes and check, if not, slip the cap off and adjust - (small screw inside). For testing, (oil flow etc) the little manual lever (yellow) can be pushed over and pulled back slightly to lock open to max flow, or left closed for minimum.
This little gold lever can be used to shut the oil supply off, lift to stop, press down to restart - a click will be felt. This is not ideal, as your only shutting off the inlet to the valve body.
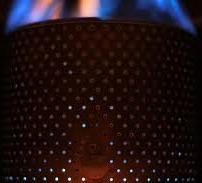
To relight, replace all, turn on the oil flow to full, and wait 20 minutes. This allows the burner to fill completely. Now check for leaks, and more crucialy, that the burner doesnt overflow. Set oil flow to minimum and Relight with a long match, or taper through the lighting port. Close up the burner door and wait 40 minutes. Never use rolled up paper or a wax taper - you will contaminate the burner. After 40 minutes turn back up to full, wait 15 minutes and inspect the burner. You should see a blue crown of flame about 5-10mm high dancing over the top of the pot. The shells should be glowing red. Any yellow flames, sizzling or popping noises is bad! Now turn back to minimum, and after 15 minutes check again. This time there should be no crown of flame, just a dull red glow from the shells, and a blue flame low down inside the shells.
Vaporising tips
- Popping noises usualy shows insufficient oil
- The main problem with these burners is carbon buildup in the inlet pipe
- If the burner is not level you will have uneven flames
- If the oil flow clicks off regularly - has to be reset with the control lever, then the oil fill jet is clogged - not easy to clear.