 Guides
 Dangers
- Electrocution
- Flood
- Scalding
- Burns
- Large flat blade screwdriver
- Cross head screwdriver
- Small flat blade screwdriver
- Large grips
- Allen keys If in doubt call a proffessional!!
Tools needed
Central heating pump replacement
READ THE DANGERS SECTION
The idea of this is so you get an idea of your system, so you know if your engineer is doing his job correctly, if you attempt a repair yourself,be carefull
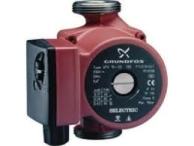
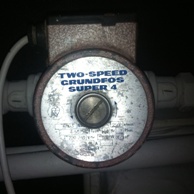
So this is a pump, There are several colours, Red,Blue,Green, and silver.
The pump will often be located by the boiler, in the boiler or by the cylinder.
The pumps sole function is to circulate water around the heating system.
Pumps, if well treated will last a very long time. Once you have replaced your pump you will know why it failed, and you must remedy the cause as well. This will usualy be air or scale in the system.
STEP 1, Power to pump OFF
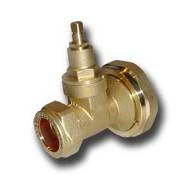
Ok, there are two types of pump valves - the things attatched to the end of the pump with large brass nuts - One has a small square shaft,
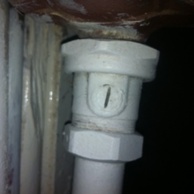 one just a screwdriver slot. My advice is to totaly drain the system if its the screwdriver type - they tend to leak.
If you have the square ended type, get a set of grips and rotate the shaft clockwise, much like closing a tap. Once resistance is felt (usualy 2-3 full turns) nip it another 1/8 of a turn. Do the same for both valves.
Electricaly Isolate the pump, disconnect the wiring, make safe.
STEP 2, Power to pump OFF
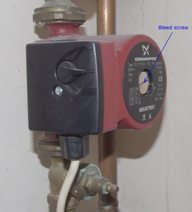
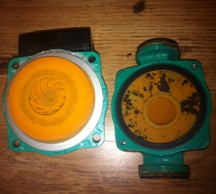
Firstly, there is a caution to this - A seized pump will be full of scalding steam, be careful!. So, With a Large flat bladed screwdriver, (or a 20p peice in a pair of pliers) loosen the silver screw in the center 1/2 a turn, then carefully remove. There should be no significant flow of water. Loosen all four allen bolts around the pump by 2 turns, they should be in place but have 2mm of thread showing. get a cloth to catch water - an old towel is ideal. as you seperate the pump halves about a litre of water will escape. Place the allen key used to open the bolts within easy reach, and carefully prise the front of the pump away from the back. as it starts to split, let the water drain in a carefull fashion. once it stops, remove the four allen head bolts and remove the pump head. If it all starts to go wrong at this point, and the water flow does not stop, retighten the pump bolts with the handy allen key.
STEP 3,
You now have a decision to make. You will notice that the pump base, the bit still attatched to central heating system, has no real significance, no moving parts or bearing surfaces, its just a lump of cast iron. What it does have, is a firm corroded grip on your pump valves. Time to choose. either
Dismantle your new pump and just fit the head or Replace it all.
Once you start to mess with the pump valve connections there is no going back. BTW, this assumes your new pump head fits the old body - usualy wilo fits wilo, grundfos fits grundfos etc... Personaly, I look to see if the pump valves and connections are healthy, (i know this sounds stupid but) if there clean and nice, I change the whole pump, if old but not leaking I change the head only. It also depends on how easy it is to swing a big wrench where the pump is.
If you just change the head, then seperate the new pump, check it fits, and screw it on with the four allen bolts.
STEP 4, Pump wrestling
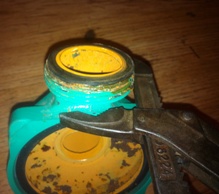
So, to change the whole pump, you have to unscrew both pump valve nuts - the ones closest to pump - there big and getting a suitable wrench is not always easy. You also have to do this without straining the surrounding pipes. THATS WHY WE TOOK THE HEAD OFF FIRST. Grip the pump body with one wrench,(no way to grip a whole pump) the nut with the other. Turn against yourself not the pipework.
TroubleshootingTry warming the nut with a blowlamp
Apply WD40 or similar to the threads and leave for an hour
Take a hacksaw or similar and cut through the valve nut, in the same direction as the pipe - cut across the thread - dont worry if you cut into pump thread, insert screwdriver into cut and rotate to crack the soft brass nut. repeat if required at other side of nut. Dont worry - the nut off a new valve slides on easily, once the pump is out
STEP 5,
The pump is now free. You now need to check the pump washers that came with your new pump. The choices are rubber or hard fibre. get the new pump and offer it up to the gap the old pump left. make sure you have it the right way up - look to see which side the old pump has dust on if you have forgotten - dusty side is top - and you will usualy find there is only enough space to easily fit one washer! fit the bottom one - carefully, making sure its centralised. fibre washers - smear with plumbers mate - rubber ones, leave alone. NOTE - the picture here is an old style grundfos, see note at bottom.
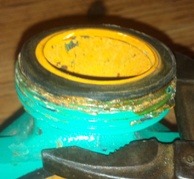 Do not re use washers that look like this!
 Hand tighten the nut till its tight - rotate the pump to check its actualy tight not 'hung up' on the thread. Now get a large flatblade screwdriver and insert it between the top valve/pump joint. Twist slightly to split them appart - GENTLE - now slightly offset the pump/valve, and slip in the washer - , then remove the screwdiver, leaving the pump/valve connection closed, but offset, then squeeze them together making sure the centralise. repeat as required. slightly loosen the bottom nut, tighten the top one (hand) again, just to test for thread 'hang up', then tighten both nuts hand tight. get your wrench, and while holding the pump head, tighten rubber washers only about 1/2 turn, fibre washers to 'tight'
Now the pump is in place, find your towel/cloth again, but do not wire the pump.crack open the top valve, and let the pump fill. Now crack the center silver screw, and bleed the air from the pump body. Assuming there are no leaks, open the other valve and wire in the pump. run the heating for 20 mins, bleed the pump body again, and nip up both main valve nuts.make sure both valves are full open, then screw in 1/2 turn. If the shaft of the punp valve shaft leaks, tighten the gland nut 1/4 - 1/2 turn - (the small nut at the bottom of the shaft)
Now, the crucial bit. Why did it fail. If there was loads of black stuff in the system, see here, if not, check the pump orientation (pump shaft should spin in the horizontal plane to have the load on the bearings, not the thrust washer) and listen for air
Pump Notes
- Very old Grundfos do not fit new Grundfos
- Wilo pumps have two allen bolts not 4
- Have a backup plan... if you cause a leak, be ready to drain the system.