 Guides
 Dangers
- Electrocution
- Flood
- Scalding
- Burns
- Flat blade screwdriver
- Cross head screwdriver
- Multimeter If in doubt call a professional!!
Tools needed
Help forum
Port valve repair
READ THE DANGERS SECTION
The idea of this is so you get an idea of your system, so you know if your engineer is doing his job correctly, if you attempt a repair yourself,be carefull
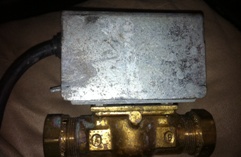
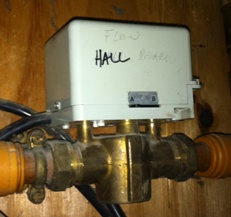
This is a port valve. ALso called a '2 port valve', 'Zone valve', 'heating valve' '3 port valve', 'honeywell valve' or diverter valve. Now ive got the page keyword count up, lets look at what they do and how to fix them. The first stage covers the two port valves, (SEVERAL TYPES) later on its 3 port, but read the two port bit first, you will need to know some of it.
First thing, a little background. When you turn on the system at the programmer, it turns on the boiler right? NO!, the programmer just powers up the port valves, IF the stat is calling for heat. The programmer powers through the stat, to the port valve, the valve motor then rotates, opens the valve and actuates a microswitch, and THAT turns on the boiler/pump.
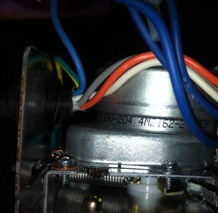
Get a good look at this item. This is the 'Honeywell' type, there are many rip off versions, most parts are interchangeable, so dont worry. We go into other types lower down. You see the little lever at the end? This is the 'manual lever', this is to override the valve.
Turn the system off, and push the manual lever across. do this with a slow firm pressure. Some resistance should be felt, and a whirring noise, if pushed fast. There should be constant firm pressure against your push, the lever should not snag and jump or lurch forward, or be floppy. The lever when released should now return to its original position, under spring pressure. Now turn on the system, turn on the programmer for both heat and hot water, turn up the hot water stat and room stat. Return to the valve and actuate the lever again. It should now slide across with little reistance.leave it in the 'manual' position, it should stay there, not spring back. Get a helper to shut the power down, and the valve should be seen and heard to close. (alternatively, nothing may happen = broken - read on)
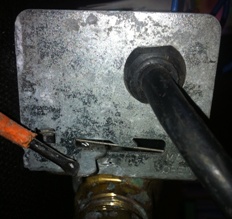
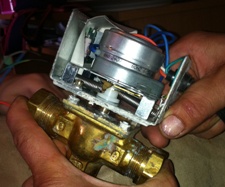
ok, power off totaly, get a screwdriver and loosen the small screw, and slide the casing off, it slides up and away. If you havent got the power off, the metal case may touch a wire...... OOOO!
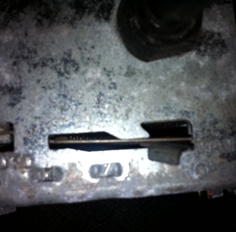
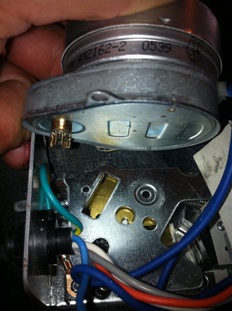
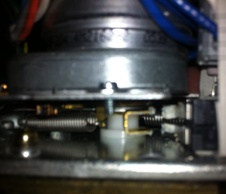
Take a good look inside the valve body. see the big silver item? called a 'syncron motor', look underneath it, see the brass cog and the small grey switch? if not, push the lever to 'manual' and you will see a little metal plate head over towards the switch. Now, power up the system as before, but BE CAREFUL ITS LIVE POWER IN VALVE. Watch the motor rotate around and swing the plate / metal tag towards the micro switch. ok, now the issues here can be - motor doesnt move or motor doesnt rotate enough to close microswitch or it rotates fine but the boiler/pump still doesnt fire.
Motor doesnt move - Ok, first check the power to the motor - your looking for 240v AC, if you dont have it, the fault is elsewhere. If you have 240v but no movement from motor, you need a new one. �18 gets you a good one, check ebay for 'syncron motor'.
Motor moves - 3 possibilities - valve base is jammed (see later on), motor is slipping on gear wheel - you will hear it jump and snag - or motor is weak. If its not jammed, junk the head, unless its very new. If the motor doesnt close the microswitch, rotate the lever to 'manual' and use a small insulated screwdriver to activate the microswitch, you should hear the pump run.
To replace the motor, take out the two, (sometimes one and a location tab) hold down screws, and draw it up and away, cut the wires, use an electrical connector block to refit the new motor, (dont worry about which way to connect the motor wires - its an ac motor it only turns one way) just slot it into place, in no particular order, the spring tension in the valve sorts out where it sits.
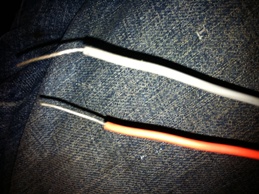
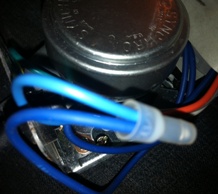
If your valve swings over and actuates the microswitch, but nothing happens, trace the orange and grey wires back to the wiring center, isolate them and check that the microswich gives continuity when pressed. if it does, your problem is elsewhere, if it doesnt, its busted, no replacement available, change valve head.

So we have covered the electrical bits - motor/gearbox/microswitch. If those are all ok, lets look to see if the valve is jammed. Looking directly into the valve, you will see two tall headed screws, at the bottom of the valve head, diagonaly opposite each other, holding the head to the body. WARNING WARNING WARNING - If you see FOUR you have the old style honeywell, you cannot remove the head on these. if your not sure, leave it be. Unscrew these two screws and the head will come off. These are captive screws so they will stay with the head.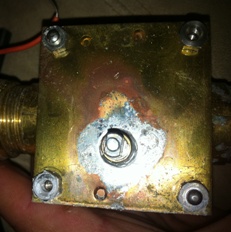 Now with your fingers, rotate he shaft stub thats left sticking out of the valve body. It wont rotate far - 1/8 of a rotation at most, but it should be smooth and easy. If its stiff, rotate it with pliers a little to try to free it.
Ok, to replace the head, put the head loosesly in place on the valve stem, rotate the lever to 'manual' and release, as the valve springs closed, the head should locate on the valve stub and drop into place, press gently onto the valve body but do not force it.Then tighten the two screws.
We have dealt with the Honeywell type, lets look at others. This one is Drayton. it has a plastic body, and a plastic 'manual' lever. at the end of the stroke on the lever it has a tendency to drop into the valve, locking the valve open, just pull out to free. Its guts are the same as a honeywell, same syncron motor, same microswitch idea. test as above. Remove the head by either pressing the button on the side, bottom of the head, half way along. (that only makes sense if you have one!), or two screws, slightly more hidden.

Ok, this is a Sunvic, there are several types - ones like above, and another type - called power open, power closed. These are sealed unit types mostly. Start by taking off the two screws holding it to the valve body and turn it upsidedown, ou will see a slot in a small white plastic circle in the middle of the valve. If the valve has a manual lever, its a spring return valve, if not its power open power closed. test the spring return as above, but 'externaly' only - check for power to the brown/blue wires in, and continuity when fully open from the grey/orange, obviously also watch for the slot to turn 90 degrees when powered up!
Ok, power open, power close. take the head off, look at slot. it should rotate slowly when powered up. look at the wiring, you will see the normal grey/orange switch wires, the earth, the neutral (blue) and a yellow and a white. test it by applying power to the yellow and white alternately, one will power the slot across the head, one in line. be patient, there slow!
Ok, 3 port valves. I dont mean to be condesending, but these are awkward, I wont go too far into these, just follow the following guide and your doing the best you can. (I find these tricky some days - the wiring system is funky)
This is what it should do - (remember to have the stats calling for heat, and take the top off for a better view) heating only on - should swing all the way open, and touch the microswitches, heating and hot water on, swing half way open to touch one microswitch, hot water only, it stays closed. Check for a knackered motor as for 'honeywell' above, watch for gearbox jump, check for stuck valve body the same way. For those of you who need to know, the wiring is like this - neutral/earth as normal, orange is switch wire, power to brown is 'half open' power to grey and brown is full open.
Notes - when testing, switch the main system power off each time you change position when testing - these valve automaticaly 'hang open' under some circumstances.
Valve Notes
- A seized syncron can be unstuck by a light twist to the small cog with pliers
- Four screw honeywell are a pig, a full drain to change the whole body is required.
- NEVER EVER mess with the wiring to 3 port valves, rewiring it is a tricky